Saturday, October 6, 2012

Creating the One Stroke Way - Day 4


Welcome back! I've been wanting an Autumn wall hanging for my entry for some time now. This series motivated me to get it done and now you can create one for yourself or a friend.

 
The supplies we need are:
-a surface to paint (I chose a canvas I had in my storage stash. You could choose paper, a board, notebook, a plate. Any paintable surface will do)
-paints (orange, burgandy, white, tan, brown, thicket, sunflower are the colors I used)
-a palette of some sort (I use styrofoam plates)
-paint brushes (I used #12 flat, #8 flat, script liner, a scruffy for the main project.  I used a sponge roller and a 3/4" brush to cover my canvas)
-a little water (we use very little with the One Stroke Painting Method)
-paper towels


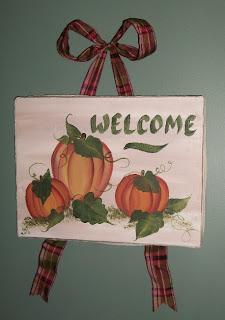
I'm going to turn this not-so-attractive long-ago-project-never-completed into the Welcome Sign you saw at the opening of this post.
Add caption
I wanted the background to be a warm, neutral color. The blue and green already there just wouldn't cut it. I used a chocolate brown color randomly over the whole surface.


Add caption

Not too pretty. Dipping the 3/4" brush into white on one side and tan on the other, I loaded it up with plenty of paint
Add caption


and then base-coated the whole canvas, starting at the top and moving from left to right, back and forth all the way to the bottom. 
Add caption
Can you see how double-loading the brush makes beautifully blended, shaded colors across the canvas? That's the beauty of One Stroke! So easy. 

Now that the surface is prepared, there's no need to wash out the brush, just blot it well on a paper towel, and then go ahead and load up your next colors. 
Add caption

I poured out puddles of orange and burgundy onto my palette and loaded my brush, ready to start work on my pumpkins. Orange mostly, but the burgandy for shading. You can see a close up of the strokes to make the pumpkins in the Day 2 post of this series. I was a little hesitant to get started, so I did some practicing on my newspaper-table-covering. I played a little with color and technique and spacing.


Add caption

I decided to paint 3 pumpkins: a large one in center, with a smaller one sitting near it, and a third smaller pumpkin to the right.
Add caption

Ok. They look like pumpkins, sort of. They are needing some help, though, aren't they? Like, stems and leaves and such?  

I want to show you how forgiving this painting method is. Mistakes are so easy to undo, cover up and make over.  I was mostly pleased with the pumpkins and was in a hurry to dress them up with greenery. But in my hurry, I grabbed the wrong bottle of paint. Instead of a thicket green color, I picked up the chocolate brown. I loaded the brown and the sunflower yellow onto my brush, and then realized this was not the color for the foliage in my little sign.

Instead of scrapping my palette and washing out my brush (using the #12 flat brush) I simply blotted the paint onto a paper towel and loaded it with the green and yellow I wanted. If a little of the brown might show through, it would be all the more natural. It all blends together and adds more depth of color.

Add caption

It actually made the perfect combination of colors for the stems. To create the stem, I made a curved stroke, like a tall skinny hill, and them made a 'U' stroke right on top of it.  You can see how it created a small cylinder with little curly-Q or circle on the top. 


Before adding the leaves to my canvas, I practiced on my worksheets. These worksheets I purchased from Dewberry Crafts. I slipped the leaf worksheet into a plastic sleeve protector, copied the sample leaves to get comfortable making them. The plastic easily wipes clean.


After testing out some different leaf patterns on my newspaper/practice pumpkins, I added them to my canvas. I used the green as the main color, and loaded a little yellow to highlight the leaves. I kept the green, being the darker color, turned to the outer edge and the yellow to the inner edge.


To add more interest, and to fill empty space, I took a script/lettering brush and loaded it with thin green paint and had some fun adding little tendrils scrolling out from the stems and leaves. I also add greenery, using a 'scruffy' brush loaded with some green and yellow paint. 

The scruffy is great fun - you use it dry, with a little paint, and pounce, pounce, pounce -- see the fluffy bed of greenery it created? And don't forget to sign your work of art. I like to add the date as well.

So, we have pumpkins with stems and leaves and tendrils and greenery. Now we need to add the 'welcome' to our sign.


Once again, I practiced on my newspaper. After experimenting a little, I decided I had better pencil in the letters on the sign before I painted them in.


And, VOILA!


You can take those pumpkins, painted on paper, cut them out and create place cards like we did below. Or greeting cards or bookmarks and oh, my! the possibilities are endless!


If you'd like to know more about the One Stroke Painting method created by Donna Dewberry, or if you are interested in her workshops, instruction books or other products, you can check her website at http://www.dewberrycrafts.com/

You can find other inspiring posts from hundreds of bloggers joining in the 31 Days series adventure hosted by The Nester. Click on over for ideas on everything from diy home decor to homemade gifts, new and improved recipes to how-to-clean and organize anything and lots more!

Wednesday, October 3, 2012

Creating the One Stroke Way - Day 3

It's been a full day here, and the day is quickly coming to a close, so today I'll share with you a peek at just a few of the goodies available through Donna Dewberry's website. She has available supplies and resources of all types. Everything from paintbrushes to workbooks to workshops. Her books provide step-by-step instruction to creating the most amazing things. She tells you everything you need to know. Many of the instruction workbooks are available for download. I have also found several of her resources available at our local library. 


These links are not affiliate links. I have personally purchased some of  Donna's materials and have been very happy with all products I've received.  I first learned about her through a public television program entitled One Stroke Painting with Donna Dewberry a couple of years ago. She made it look so simple, I was intrigued, I gave it a try, and the rest is history. Come along with me this month and we'll do some creating together.

You can follow along my entire 31 Days of Creating with One Stroke Painting by clicking here.


If you'd like to know more about the One Stroke Painting method created by Donna Dewberry, or if you are interested in her workshops, instruction books or other products, you can check her website at http://www.dewberrycrafts.com/

You can find other inspiring posts from hundreds of bloggers joining in the 31 Days series adventure hosted by The Nester. Click on over for ideas on everything from diy home decor to homemade gifts, new and improved recipes to how-to-clean and organize anything.          and lots more!

Tuesday, October 2, 2012

Creating the One Stroke Way - Day 2

Yesterday, (click here to read the first post in this series) I shared with you how we were going to create beautiful things together using the One Stroke Method of painting. Today we'll get started with some of the basics you'll need to know. Grab a flat paintbrush, dip it into water and then dab it dry on a paper towel.


We will be working with a dampened paintbrush to start, but will NOT be dipping the paintbrush into water between strokes.  The wonderful thing we'll be doing in these painting projects is loading 2 or more colors of paint onto our brushes and then painting and shading all at the same time. 


In the spirit of the season, I'm working on pumpkins. I poured a puddle of orange and a puddle of yellow paint onto a styrofoam plate. I dipped one side of my brush into the puddle of orange. Then . . .


I dipped the OPPOSITE side of the brush into the puddle of yellow. Be sure to scoop up plenty of paint. Everything will flow much better, you'll get better coverage that way. Don't be stingy - you'll want lots and lots of paint on that brush! Now, we'll work the paint into the paintbrush, by pushing your brush back and forth, back and forth, make a stripe an inch or two long.


See how the two colors gradiate from the orange on one side of the brush to yellow on the other side? 
After working your colors into the brush, you will lay your brush onto your painting surface. (I'm using plain old paper in my practice samples here.) Below you see how I took my brush and made a 'comma' or 'c' stroke on my paper.


Look at how the colors blend and gradually change. If I had not worked my brush back and forth, I would instead have a definite orange and yellow stripe. Take time to practice and play around with color and loading paint and making different sizes and shapes of strokes.


Now, for the pumpkins. I played around with those comma strokes, layering them and building one upon the other in a way that creates an image of a pumpkin.


I even experimented loading a third color, burgandy, onto my brush to give more depth and shading to the sections of my pumpkins.


Tomorrow, I'll take you step-by-step as we create pumpkins perfect for placecards at your Thanksgiving table or a sign for your Fall Harvest part or a Welcome plaque to greet guests.


If you'd like to know more about the One Stroke Painting method created by Donna Dewberry, or if you are interested in her workshops, instruction books or other products, you can check her website at http://www.dewberrycrafts.com/

You can find other inspiring posts from hundreds of bloggers joining in the 31 Days series adventure hosted by The Nester. Click on over for ideas on everything from diy home decor to homemade gifts, new and improved recipes to how-to-clean and organize anything.          and lots more!

Monday, October 1, 2012

Creating the One Stroke Painting Way - Day 1


During the month of October, I will be taking time each day to do some creating. 31 Days of Creating! This winter there will be a wedding to plan and grandchildren arriving and Thanksgiving dinner to prepare and Christmas gifts to get ready, besides keeping up with everyday tasks like meals and schooling and housework, I'm going to need some type of creative, restorative outlet and activity. Getting the creative juices flowing and producing beautiful and useful items with my own two hands does just that (you can read more about my thoughts on being creative here.)
I will be painting my little heart out and transforming plain old items such as paper, cardstock, canvas and picture frames into beautiful works of art, using the One Stroke Painting method developed by Donna Dewberry.

For the next 31 days, I will be sharing with you some basic painting techniques, project ideas, and tips for creating lovely gifts, sprucing up ho-hum decor items and finding that creative bent you didn't even know you possessed. Be sure to check back each day to see my progress. Maybe you'll find some inspiration yourself!

To keep me motivated and on track, I'm joining in with hundreds (yes, I said hundreds over a thousand!) of other bloggers who have taken the challenge to post on a particular theme for the 31 days of October. You will find links to their websites over at the Nesting Place.

If you'd like to know more about the One Stroke Painting method created by Donna Dewberry, or if you are interested in her workshops, instruction books or other products, you can check her website at http://www.dewberrycrafts.com/

You can find other inspiring posts from the many bloggers joining in the 31 Days of . . .  adventure hosted by The Nester. Click on over for ideas on everything from diy home decor to homemade gifts, from new and improved recipes to how-to-clean and organize anything,  and lots more!

You can follow along with our progress this month, by clicking on the links below:
Day 2-Learning the basics
Day 3-One Stroke Painting workbooks
Day 4-Pumpkins, Welcome Sign
Day 5-A rose is a rose
Day 6-Bookmarks 
Day 7-Leaves and Determination
Day 8-Sunflowers
Days 9 and 10-a daughter's creation and Coneflowers
Days 11 and 12-Butterflies and Cute Little Critters 
Day 13-Paint a Frog
Day 14-Paint a Butterfly 
Day 15-A Bowl of Fruit 


Would you like to follow my current 31 Days series? You'll find it HERE!

Monday, September 17, 2012

Our Class Room


Welcome to our "School Room"


This is where we "do" school (you can read about our recent transformation of this room here)


Well . . . this is where we do some of our school work. Our basic book work, anyway. Now, take a look at where we do the rest of our schooling. 


Geography Class on the Living Room Floor

Astronomy Class out by the barn
Science Class down at the bridge
learning all about gravity and river currents

P.E. Class in the front yard as we re-enact the Olympic Torch Relay

Art Class around the kitchen table

Music Class - when friends gather in the basement after a long weekend of movie-making


Schooling, Education, Learning -- It's a lifestyle. It's a mindset. It's happening all around us, all the time, in God's Classroom. The secret to a successful education is to open our eyes, our ears, our minds, our hearts and take it all in. Enjoy the adventure!

This week I'm linking up to Big Family Friday

Tuesday, August 28, 2012

Menu Plan - 8/27 to 9/02

We are all switching from summer mode to normal mode, kicking off a new school year, and so very ready for cool weather to arrive.  And while everyone is wrapping up another month, in my kitchen I'm beginning anew. My 'menu month' usually begins the last weekend before the first of the month.

That means I spent Thursday evening taking inventory in the pantry, cupboards and freezer. Friday was spent in town, stocking up. This month it also meant that Gabe was my shopping buddy (he is always sure to find the best deals for me, he's a numbers guy!) and coffee with a great friend (thanks, Deb!). A full, but very pleasant day.

You know what Saturday meant, don't you? Absolutely - it was Cooking Day. This month it was my own custom-big-batch-once-a-month cooking-day. Rather than getting my 25-30 meals actually assembled and in the freezer, I did some basic chopping, cooking, combining - basically, any meal-prep possible, but not as many fully assembled meals. And, as always, I made a list of my planned meals. It's going to be a five-week month for me, so I have to have a plan in place to make things stretch. My master list sure does help me stay on track.

Because the day went so smoothly and I still had plenty of energy left in me, I told the kids I'd make homemade fries for supper (usually I start a pot of beans in the a.m. and everyone has to dig in and help themselves, adding chips and taco toppings). I came across a great deal on potatoes --  50# for $11.50. For red potatoes! Just look at these beauties, waiting happily in the cellar. You can just imagine what we'll be eating day in and day out this month, eh? How many different ways can you serve potatoes, anyhow? But, I digress - back to homemade french fries.

The news was so well-received, I even had extra volunteers in the kitchen when it came time to fix up those potatoes. Esther brought an armload up from downstairs, Bekah helped peel a few, and Luke offered to cut them into strips, while I dropped them into the fryer. After a bit, I noticed the pile of raw potato strips was dwindling, but there were still some potatoes to be cooked up, and Mr. Potato Man was all hunched up over the cutting board.


 What was he up to? How long does it take to slice through a few more potatoes? Well, that all depends. Not long for most of us. But, if you are budding woodcarver, well, then. . .

you wouldn't want to pass up on an opportunity to display your skill and . . .


 . . . art.  Now, how many of you have had french-fried links to go with your burgers?


Now for this week's menu, which I'll be linking up over at Menu Plan Monday and Tasty Tuesday:

Monday
Lunch -- Veg/Beef Soup 
(broth and beef cooked on Saturday, throw in veggies and you have a quick and easy lunch)
Supper -- Tacos 
(Mexican Monday is tradition around here)

Tuesday
Lunch -- Hot Dogs 
(a kid favorite, and easy for Mom)
Supper -- Chicken Giardino 
(my own version of my favorite Olive Garden dish, which they sadly no longer have on the menu)

Wednesday
Lunch -- Mac and Cheese 
(Mom prefers homemade, kids would rather have easy/schmeasy Kraft-type -- we'll see)
Supper -- Smothered Venison
(a good old stand-by crockpot meal)

Thursday
Lunch -- Tuna Salad
(love this with hard-boiled eggs, my own relish added, served on fresh ww bread toasted) 
Supper -- Tator Tot Casserole
(date night for Mom and Dad, so this kid-friendly-pop-it-in-the-oven dish is perfect)

Friday
Lunch -- Quesadillas
(a little cheese, a little cooked chicken,  2 flour tortillas, heated on an iron skillet)
Supper -- Pizza Night
(of course!!!)

Saturday
Lunch --  LeftOvers
(everything mus'go!)
Supper -- Hamburgers
(Luke my GrillMaster is cooking)

Sunday
Lunch -- Taco Salad
(Basket Dinner at church -- need to have some dessert ready, also)
popcorn, apples, and get-your-own for Sunday night

Wednesday, August 1, 2012

Simple Woman's Day Book


FOR TODAY
Outside my window... Bright Summer Sunshine

I am thinking...
Does God allow the extremes, like this drought, so we will turn our attention to Him?

I am thankful...
my mother-in-law, who happily transports the younger guys to the summer library program each week.
 
In the kitchen... breakfast dishes, the smell of freshly baked bread, and tomatoes ready salsa-making.

I am wearing...
a comfy jersey knit skirt and a heather-colored top, and my well-worn apron, of course!

I am creating...
a quilt for a niece's wedding gift, crocheted baby blankets for future grandbabies and crochet/beaded candle toppers for a friend.

I am going...
wherever the Lord leads. First, to the stove to preserve some of the bounty of our garden. And then once the work is done, a roadtrip south will be just the thing.

I am wondering...
why do some have so much energy and get so much done, while I do not.

I am reading...
Galatians; 28 Days to Hope for Your Home; Grace for the Good Girl; Smooth and Easy Days

I am hoping...
rain will return soon.


I am looking forward to...
the return of our daughter and her family, and the chance to have ALL my children together in the same place at the same time again.

I am learning...
yes, always learning, to stay out of the way and allow my children to learn some of life's lessons on their own.

Around the house...
it is very quiet here (thank you Grandma, for taking the kids this morning!) and so I have time to ponder and sing and pray while mopping up spilled lemonade.

I am pondering...
will I ever truly be ready for my chick-a-dees to fly the coup? It gets easier, but is still a hard thing.

One of my favorite things...
the imagination of my 6-year old, who just this morning dressed a 2 1/2 foot tall dinosaur in cowboy boots and a wrist watch to keep guard over the snack bin.

A few plans for the rest of the week:
  salsa-making, list-making, shopping trip, packing

A peek into my day...
several phone calls to make, garden produce to put up, water the garden (again!), Bible Study tonight

Did I mention the imagination of my 6 year old?


this post is written in participation with Simple Woman's Daybook

You Might Also Enjoy:

these related posts